
 Russian
  中文
中文  العربي
  Bahasa Indonesia
 Creating the Volumes indicator
1. Creation of the template.
- We start the mCode editor in any way: there is a corresponding button in the menu on the right,
and in the Indicators menu - the corresponding item.
- In the editor window that opens, click the Create Indicator button.
- In the dialog box that opens, set the file name.
“As you call a boat, that is how it will float” - in the sense that the name of the file will become the name of the indicator in the list of user indicators of the trading terminal.
Accordingly, the name of the indicator is given in Russian if we want to see it in the list in Russian, and vice versa. The editor allows spaces in the file name, but they are best avoided for reasons of operating system compatibility;
instead of a space, it is better to use an underscore after restarting the terminal, these characters in the indicator name in the list of custom indicators will be replaced by spaces and readability will not be affected.
Enter the file name (no need to specify the extension) click the Add button.
The file name appears in the list on the left.
To the left of the file name there will be a symbol a dot, while gray; it will turn green when we activate the indicator, but before that the template created for us needs to be filled with content,
so that it becomes a valid indicator.
The standard template proposed by the editor at the time of writing this text looks like this:
export class Main extends Indicator {
constructor() {
super();
this.addInput("PriceType", InputType.PriceType, PriceType.Bid);
this.buffer = this.addBuffer();
}
onInit() {
}
async onUpdate() {
}
}
What is it? preparation of the program in the language JavaScript [developer.mozilla.org/ru/docs/Web/JavaScript], which we have to supplement to a full indicator.
Let's go in order (the order, however conditional, we can arrange the functions differently - onUpdate, onInit, constructor; the interpreter will figure out what's what):> export class Main extends Indicator We create and export a class called Main a child class (inheriting properties) predefined class Indicator. “This isn’t understood by the mind, so just remember,” the joke says, and it’s quite possible to relate to this entire line in this way, it is the same for all custom indicators, as far as I know. But if you wish, you can understand here are links to the corresponding JavaScript and mScript documentation:
developer.mozilla.org/ru/docs/Web/JavaScript/Reference/Statements/export
developer.mozilla.org/ru/docs/Web/JavaScript/Reference/Statements/class
developer.mozilla.org/ru/docs/Web/JavaScript/Reference/Classes/extends
mtrader6.com/docs/Terminal/mScript/JavaScript/v1/Indicator
mtrader6.com/docs/Terminal/mScript/JavaScript/v1/mScript
Our template program so far consists of three parts: the constructor method and two functions onInit and onUpdate, this is the minimum set that can be expanded if necessary.
- constructor creates and initializes the objects necessary for the indicator to work
developer.mozilla.org/ru/docs/Web/JavaScript/Reference/Classes/constructor
Initially, the constructor in the template contains three lines:
super();
developer.mozilla.org/ru/docs/Web/JavaScript/Reference/Operators/super
"In the constructor, the super keyword is used as a function that calls the parent constructor. It must be called before the first call to the this keyword in the body of the constructor."
this.addInput("PriceType", InputType.PriceType, PriceType.Bid);
Add a request for a price type to the initial dialog box.
this.buffer = this.addBuffer();
mtrader7.com/docs/Terminal/mScript/JavaScript/v1/mScript/addBuffer
Create one buffer. If necessary, create several of them. onInit is standard indicator initialization function, executed immediately after the indicator is loaded by the client terminalmtrader7.com/docs/Terminal/mScript/JavaScript/v1/mScript/onInit
This function does not do anything yet we will write there what we consider necessary.
- onUpdate is a standard function that is executed every time a new tick is received by the symbol for which the indicator is calculated: it is she who draws and redraws the indicator elements in the terminal window just as we tell her.
This function is asynchronous async:
developer.mozilla.org/ru/docs/Web/JavaScript/Reference/Statements/async_function
so that we can use the await expression in this function, "which pauses the execution of the async function and waits for a response from the passed Promise, then resumes the execution of the async function and returns the received value."
More details: developer.mozilla.org/ru/docs/Web/JavaScript/Reference/Operators/await
This function also does not do anything yet - it depends on us what we want in the end.
2. We complete the template to the indicator.
We will consider creating an indicator using the Volumes indicator as an example. Along the way, consider the possibilities of Russification of the original indicator.
Do not forget to save already written more often.
First row
export class Main extends Indicator {
leave unchanged.
We add the constructor to the form we need.
constructor() {
super ();
this.setProperty (Property.SeparateWindow, true); // The indicator data is displayed in a separate window? true = yes; false = no, but this is the default value, then this line can be excluded

this.setProperty (Property.ShortName, "Volumes"); // Display name of the indicator = Volumes (Volumes in the original)
this.setProperty (Property.Minimum, 0); // Set the minimum indicator value = 0
mtrader7.com/docs/Terminal/mScript/JavaScript/v1/mScript/setProperty
this.addInput("Тип цены", InputType.PriceType, PriceType.Bid); // Indicator input - default purchase price, Bid;
It can be changed in the indicator initialization dialog box. We will Russify the label of the dialog box asking about the price type: "Price Type".
If, in principle, we are satisfied that “Price Type” = Bid (by default), then this line (price type request) can be excluded so as not to fool the user with unnecessary questions.
This is not the only possible request, in other indicators we can request other data from the user for calculations - for example,
this.addInput ("MA_Periods", InputType.int, 49);
this.buffers = {// We need not one, but two buffers for the values of our indicator - Up and Down
ExtVolumesUpBuffer: this.addBuffer (), // buffer into which data is entered in case of indicator growth
ExtVolumesDownBuffer: this.addBuffer (), // buffer into which data is entered in case of indicator drop
};
this.arr = {
ExtVolumesBuffer: []  // array of stored volumes
}
}
Fill us with the meaning of onInit ()
onInit () {

this.buffers.ExtVolumesUpBuffer // initialization of the first of the buffers - the buffer for increasing the indicator value

.setShape (Shape.Histogram) // chart view - Histogram;
mtrader7.com/docs/Terminal/mScript/JavaScript/v1/Buffer/setShape
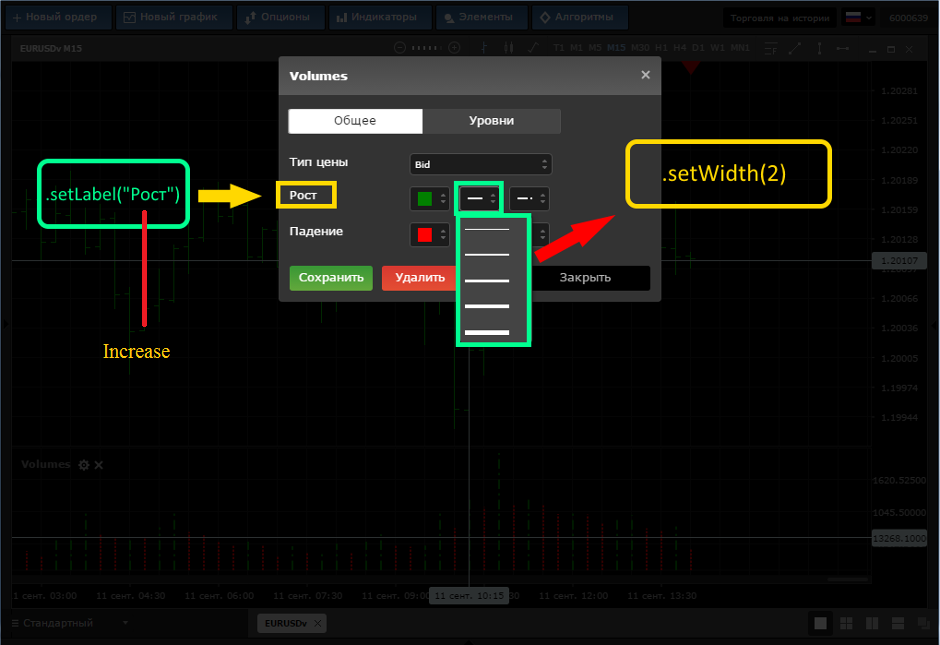
.setColor(Color.Green) // histogram line color for Growth (UP):
mtrader7.com/docs/Terminal/mScript/JavaScript/v1/Buffer/setColor
.setLabel("Рост") // the name of the menu item in the window for launching the indicator (in the original Up)
mtrader7.com/docs/Terminal/mScript/JavaScript/v1/Buffer/setLabel
// default line thickness = 2 (you can choose another one from the drop-down menu when the indicator is added to the chart window):
mtrader7.com/docs/Terminal/mScript/JavaScript/v1/Buffer/setWidth
.setDigits(0) // indicator accuracy is the number of characters of the indicator values after the decimal point;
mtrader7.com/docs/Terminal/mScript/JavaScript/v1/Buffer/setDigits
.setDrawingStyle(3) // in the initialization window, you can also set the default line style;
mtrader7.com/docs/Terminal/mScript/JavaScript/v1/Buffer/setDrawingStyle
;
this.buffers.ExtVolumesDownBuffer // initialization of the second buffer - the buffer for dropping the indicator value; similar to the first buffer
.setShape (Shape.Histogram) //
.setColor (Color.Red) // line color DOWN
.setLabel ("Drop") // (in the original Down)
.setWidth (2) //
.setDigits (0) //
.setDrawingStyle (2) //;
} // end of the initialization procedure
And finally - the actual calculations and the organization of the display of their results.
async onUpdate() { // get input variables: // get previously requested price type as an object
mtrader7.com/docs/Terminal/mScript/JavaScript/v1/mScript/getInputs
// const - constant:
developer.mozilla.org/ru/docs/Web/JavaScript/Reference/Statements/const
const {PriceType} = this.getInputs (), // get accumulated buffer data:

{ExtVolumesDownBuffer, ExtVolumesUpBuffer} = this.buffers,

{ExtVolumesBuffer} = this.arr, // request from the terminal an array of {Volume values for each bar} and wait for it to fill:
mtrader7.com/docs/Terminal/mScript/JavaScript/v1/Bar/load
mtrader7.com/docs/Terminal/mScript/JavaScript/v1/Bar/Mode
{Volume} = await Bar.load ([Bar.Mode.Volume], PriceType),

// barSize = the number of elements in the Volume array

barSize = Volume.length;

// declaration of variables valid only within the given program block
let i, nLimit, vol,
nCountedBars = Bar.counted (); // nCountedBars = the number of bars that have not changed since the last launch of the indicator:
mtrader7.com/docs/Terminal/mScript/JavaScript/v1/Bar/counted
		// if nCountedBars is greater than zero, decrease the value by 1

if (nCountedBars> 0) {
nCountedBars--;
}

nLimit = barSize - nCountedBars; // limit the number of iterations of the loop

// cycle along i from zero to nLimit-1 in increasing i with step 1 - from the last bar to the beginning of the chart

for (i = 0; i  Volume [i + 1]) {// if this is the last available value of the Volume array or this Volume value is greater than the Volume of the previous bar (left, earlier), then

ExtVolumesUpBuffer.set (i, vol); // draw the next (for a bar with index i) histogram value with the UP buffer color and the height of the Volume value

ExtVolumesDownBuffer.set (i, 0); // do not paint anything with color DOWN
} else {// otherwise

ExtVolumesUpBuffer.set (i, 0); // draw the next (for a bar with index i) histogram value with the color of the DOWN buffer and the height of the Volume value

ExtVolumesDownBuffer.set (i, vol); // do not paint anything with UP color
} // end of conditional statement
} // end of loop
} // end of onUpdate procedure
}
Now we have everything for the indicator to work. In the mCode editor, click the Add to My Indicators switch (it will turn green) and click Save - the dot to the left of the indicator name will also become green.
We go to the trading terminal, select the chart of the desired currency pair, and add our indicator to it through the menu Indicators - User - Your_Indicator_Name.
If everything is done correctly, the result of the indicator will be displayed in the chart window.